Flooring Installation Guide
Important Information Before You BeginIt is Extremely Important that you read and understand this information completely prior to starting, since improper installation can void the warranties.Regardless of manufacturer's instruction, we recommend acclimating your purchased hardwood flooring prior to installation. Length of acclimation depends on thickness of the hardwood and or whether your product is solid or engineered.
Installer / Owner ResponsibilityCarefully inspect ALL material prior to installation for defects. Materials installed with visible defects are not covered under warranty. Remember , Wood is a natural product that can vary in color, grain, and contains natural characteristics that varies from plank to plank and is to be expected. We do not warrant against these natural variations from plank to plank or variations from sample to plank. Remember , If you are not satisfied with the flooring prior to installation, simply return the cartons to your dealer for a full replacement. Accepting or rejecting the material must be done on full shipment of quantities only, not carton by carton or plank by plank. Material is manufactured to exceed industry standards (ANSI/HPVA EF 2002).We urge you, as the final inspector to inspect for proper color, finish, style, and quality PRIOR to installation. Verify that the flooring is the correct material. Care should be taken at this time to remove or repair particular characteristics you do not desire. Manufacturer declines responsibility for any costs incurred when plank (s) with visible defects have been installed.
Required Tools for Proper Installation
Power Tools
Table Saw, Electric Miter Saw, Band Saw, Chop Saw, Power Jamb Saw, or Jig Saw
Hand Tools
- Broom or Vacuum
- Tape Measure
- Chalk Line & Chalk Hammer
- Moisture Meter
- Hand Saw
- 3M, Safe Release Tape #2080 Blue Mask Tape
- Safety Glasses
- Color Wood Filler
- Bona Harwood Floor Cleaner
- Pry Bar
- Straight Edge
Additional Tools for Glue-Down Installation
- Adhesive
- 3M Safe Release Tape #2080
- Rags
- Square notch trowel
- Urethane Adhesive Remover
Additional Tools for Staple-Down Installation
- Pneumatic Stapler/Nailer
- Drill
- Air Hoses
- 15-pound Roofers Felt
- Tapping Block
- In-line Air Regulator
- Compressor
Additional Tools for Floating Floor Installation
- Adhesive
- Terry Cloth Towels
- Foam underlayment
- 6 Mil Poly Plastic Sheeting
- Tapping Block & Spacers
Room Layout and Pattern
While the choice of color is the most important design decision when it comes to any decorative surface, pattern is also important. That is especially so when it comes to specialty themes, such as wood floors employing a theme reminiscent of Historic Colonial Williamsburg floors with a pattern of 3-inch and 5-inch alternating planks.Pattern also plays a role in creating a focal point in a room. Consider how planks running toward a fireplace hearth would help lead your guest's eyes in that direction. Pattern contributes to other design needs such as making a large room feel smaller and more cozy simply by using wide planks. Diagonal plank patterns work well as problem-solvers when walls are not running parallel or are out of square.We offer many different pattern selections, not all of which are available in all wood tones. These include 2 1/4-inch strip flooring, and 3-inch and 5-inch planks. The most popular patterns by far are the 3-inch wide planks.
Determining Layout for a Room with a Border:
For either parallel or diagonal layouts, you need to establish working lines at the perimeter of the room. In Diagram One, dotted lines A and B will represent the estimated inside working lines of the border.
To Establish Perimeter Working Lines:
The distance between the two parallel lines A should be equal to a multiple of the width of the materials being installed. Parallel lines A should also be equidistant from their adjacent walls. These lines should be adjusted to fit the width and the aesthetics of the border design. If the number of pattern repeats is uneven, it will be necessary to adjust the Y axis working line so that the pattern is even on each side of the room. Using a chalk line, snap parallel lines A, which represent the inside of the parallel border.To establish perpendicular lines B, parallel to each other, measure the distance between one parallel line A and the adjacent walls. Measure the distance from the reference point of line B to the X axis line. Perpendicular lines B must be equidistant from the X axis line. Once these lines have been established, snap working chalk lines. These lines represent the inside of the perpendicular border.For fields installed on a diagonal, it is important to adjust lines A and B to represent a distance from the wall that is equal to a multiple of the width of the units installed as the border. Snap a chalk line at this point; that line now becomes a working line.
- Subfloors must be clean and free of dirt, curing compounds, sealers, drywall mud, paint, wax, grease, urethane, or other materials that may affect the integrity of the flooring material or adhesives used to install the flooring.
- All subfloors and subfloor systems must be structurally sound and must be installed following their manufacturer's recommendations. Local building codes may only establish minimum requirements of the flooring system and may not provide adequate rigidity and support for proper installation and performance of a hardwood floor. Whenever possible install the planks perpendicular to the floor joists for maximum stability. Our warranties DO NOT cover any problems caused by inadequate substructures or improper installation of said substructures.
- Test wood sub floors and wood flooring for moisture content using a pin-type moisture meter. The moisture content of the subfloor should not exceed 13% and the moisture content of the wood should be within 4% of the subfloor moisture content.
- The moisture content for concrete subfloors registered after a calcium chloride test should not be greater than 3 pounds per 1000 square feet of area. If it exceeds these limits, DO NOT install the flooring. Before moisture testing begins, the slab must be cured for a minimum of 30 days.
- Basements and crawl spaces must be dry. Use of a 6 mil black polyethylene is required to cover 100% of the crawl space earth. Crawl space clearance from ground to underside of joist to be no less than 18, and perimeter vent spacing should be equal to 1.5% of the total square footage of the crawl space area to provide cross ventilation.
- The subfloor must be flat, meeting a minimum of 3/16, within 10, or 1/8, in 6,. Concrete subfloors - Grind high spots or use a Portland-cement-based leveling material (minimum compressive strength 3000 psi) to fill all low spots. Follow the leveling compound manufacturer,s instruction. Leveling compounds must be allowed to thoroughly cure and dry prior to installation of wood flooring. Wood subfloors - For staple down application use layers of 15lb. felt or wooden shims to fill low spots. Staples must be able to penetrate for holding power.
- All ,wet, work , i.e. , paint, drywall, concrete, masonry, plumbing must be complete and dry well in advance of delivery of hardwood flooring.
- Gutters and downspouts should be in place and the exterior grade complete to allow for proper drainage of water away from the building,s exterior perimeter.
- Flooring should not be exposed to extremes of humidity or moisture.
- Where permissible operate permanent HVAC 5 days minimum prior to installation of wood flooring.
- If HVAC is not possible at time of installation the environmental conditions must be at or near normal living conditions between 60 , 80 degrees and at the average yearly relative humidity for the area.
It is the Installer / Owner responsibility to ensure that the conditions are acceptable prior to the installation of the hardwood floors. The manufacturer declines any and all problems with the hardwood flooring that are related to or attributed to improper jobsite conditions.
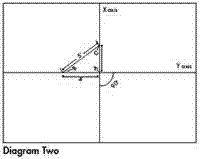
Parallel Layout:For parallel layouts, you will need to begin with 90-degree working lines at the center of the room. To establish a 90-degree working line start by snapping a chalk line through the center of the room (line Y). See Diagram Two. The next line (X) must be exactly 90-degrees to line Y to form a perfect square corner. To ensure this angle, do the following:From the center point (A) of line Y, measure four feet along line Y and mark that point (B).From the same center point, measure three feet in the general direction of where line X will be and scribe an arc.Return to the original four-foot mark on line Y and measure five feet, scribing an arc that crosses (point C) the three-foot arc you made in the previous step.Verify all measurements before proceeding.If correct, snap a chalk line through the conjunction of the two arcs and the center point of line Y. This will be line X, at an exact 90-degree angle to line Y.
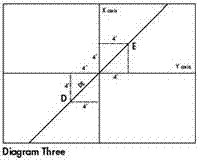
Diagonal Layout (Standard):For diagonal layout of linear or uniform size units, you will start with a diagonal working line in the center of the room. (Herringbone installation requires a different working line.) To establish a 45-degree working line, Line DE must be positioned at exactly a 45-degree angle to lines X and Y to form working lines for diagonal layout. To accurately ensure this angle, do the following:From the center point, measure four feet down in each direction on lines X and Y.From each of these points, measure four feet and scribe an arc. The conjunction of these arcs creates points D and E.Snap a chalk line between points D and E, and the center point. This line represents a 45-degree angle.
Special Layout Note for 5-inch-wide PlanksBefore measuring out from the starter wall, do a calculation to determine the width of the last row of planks. If the last row is less than 1 1/2 inches wide, add that dimension to 5 inches and divide the sum in half. Add this dimension to Step #1 to determine the location of the chalk line.Snap a chalk line from these points, parallel to that wall and perpendicular to the adjacent walls.Since most walls are not straight, the edge of some planks installed against that wall may have to be trimmed (scribed) along their width to fit. Remember: It is not necessary to leave an expansion space for 3/8" and 1/2" products, unless the room is larger than 20 feet in either direction.
Pre-Installation / Job PreparationIt is the installer/ owners, responsibility to ensure that the jobsite conditions and jobsite subfloor are environmentally and structurally acceptable prior to the installation of any hardwood flooring. The manufacturer declines any responsibility for failures or deficiencies of hardwood flooring resulting from or related to sub-floor, sub-surface, or job-site environmental conditions. All substrates must be clean, flat, dry, and structurally sound.
Recommended Subfloor Surfaces
Concrete Subfloors: Concrete slabs should be of high compressive strength and constructed to prevent groundwater from permeating the concrete. Engineered hardwood flooring can be installed on, above, or below-grade. In addition, it can be installed over above-ground, suspended concrete floors. The suspended concrete must be a minimum of 1 1/2 inches thick and must be structurally sound. The exception to this is lightweight concrete (which usually contains high amounts of gypsum) having a density of 100 pounds or less per cubic foot. Test for lightweight concrete by using a nail to scratch the surface of the concrete. If the concrete crumbles or turns to powder, it is not sound and you should NOT install the hardwood flooring. Use the floating installation method (products 4 ,, or wider) only for lightweight concrete subfloors.
Wood Subfloors: Preferred Subflooring ,, (23/32,, 18.3 mm) CDX grade Plywood subfloor/ underlayment (Exposure 1), 4,x8, sheets or ,, (23/32,, 18.3mm) OSB subfloor/ underlayment grade, PS2 rated, sealed side down, with joist spacing of 19.2, (475) on center or less.
Minimum Subflooring - 5/8, (19/32, 15.1mm) CDX Plywood subfloor/ underlayment (Exposure 1), 4,x8, sheets, maximum 16, on center joist construction.
Follow panel manufacturer,s recommendations for spacing and fastening. Typical panel spacing and fastening for joist systems, 1/8,(3.2mm) around perimeter and fastened every 6, (150mm) on bearing edges and every 12,(300mm)along intermediate supports. Installation of flooring should not be made over joists spacing greater than 19.2 on center or parallel to the joists unless the subfloor has been properly strengthened, applying a second layer of underlayment may be necessary to bring the overall subfloor thickness to 1-1/8,.
- Test the moisture content of the wood subfloor and wood flooring with a pin type moisture meter. Wood subfloors must not exceed 13% and the wood flooring should be within 4% of the wood subfloor.
- For existing wood floors install new flooring at right angles to the existing flooring.
- Do not glue, staple, or nail down hardwood flooring over particle board, floating application is acceptable (products 4 ,, or wider).
- Do not install over existing glue down hardwood floors.
Ceramic tile and terrazzo: All wax and sealers must be removed with an appropriate cleaner / stripper. Ceramic tile and terrazzo should be abraded to allow for proper adhesion. Check for loose tiles by tapping and re-adhere. Fill grout lines with a cementitious latex fortified leveling compound.
Resilient tile, resilient sheet vinyl: Material must be full spread and secured to the subfloor. Do not install over perimeter glued floors. Do not install over more than one layer that exceeds 1/8, in thickness.
Nail/ Staple Down Only - If old flooring is unsuitable to install new flooring then overlay with new underlayment. Test to conclude that the staples/ cleats are able to properly penetrate and secure the flooring to the subfloor.
Glue Down Only , Do not install over more than one layer that exceeds 1/8, in thickness. Clean flooring with an appropriate cleaner and allow to thoroughly dry. If necessary degloss the floor using an abrasive pad to enhance the bonding of the adhesive, if wax or other coatings are present, completely remove the material with a quality stripper, rinse the floor and allow to dry. Always check for proper adhesion bond prior to installing.
CAUTION: DO NOT SAND any existing resilient tile, sheet vinyl flooring, or flooring felt as they may contain asbestos fibers that are not readily identifiable. Inhalation of asbestos dust can cause serious bodily harm. Check local, state, and federal laws for handling hazardous material before attempting the removal of these floors.
Acoustic Cork Underlayment: (Glue Down Only) , Install the cork underlayment according to the manufacturer,s instructions. The cork underlayment must be fully adhered to the subfloor. The cork underlayment should be of pure granulated cork combined with a polyurethane binder with a minimum density of 11.4 lbs. per cubic foot and not to exceed 13 lbs. per cubic foot. Radiant Heated Subfloors , Not recommended. Manufacturer declines any responsibility for floors installed over radiant heat.
Pre Installation / Job Preparation
Inspect the Flooring , Inspect material for color, finish, milling, and grade. Hold out pieces that may not be acceptable once installed. PLEASE NOTE: We do not accept responsibility for any costs incurred when plank(s) with visible defects have been permanently installed.
Undercut Door Casings - Undercut all door casings 1/16" higher than the thickness of the flooring being installed. To do this, use a scrap piece of flooring as a guide. Lay it on the substrate and cut the casing with a handsaw or use a power jamb saw set at the correct height.
Blending of Cartons - To achieve a uniform appearance across the entire floor, we highly recommend that you open and work from several cartons at a time and dry-lay the flooring, mixing the planks from several cartons. This will allow you to blend the planks for maximum aesthetic appearance. Make certain the room is well lit to ensure color is consistent and that any visual defects can be seen and removed.
Match Transition Moldings: For best appearance blend all transitions and moldings to planks that have similar color and graining. Set them aside for use as needed.
Layout of Flooring: ,Racking the Floor, is essential to achieve a random appearance. Start by either using random-length planks found in the carton or by cutting four or five planks in random lengths, differing by at least six inches. As you continue working across the floor try to maintain a six-inch minimum between end joints. Randomly install different lengths to avoid a patterned appearance. Never waste materials; the end cuts from starter rows should be used at the opposite side of the room to complete rows or used to start the next row.


Glue-Down Installation
NOTE: With the Glue,, you MUST install the hardwood flooring by using the "Off the Floor" technique. In other words, you MUST be working from the subfloor and NOT standing or walking on the newly installed flooring during installation. Failure to follow this procedure can result in the planks moving during installation, creating gaps at both end and side joints. Do not roll A.F.B. Glue,.
Before you begin using the following instructions, please refer to the Pre-Installation Job Prep information above.
Getting Started
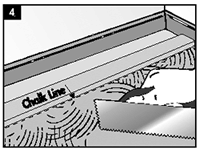
1. Select a starter wall. An outside wall is best: it's most likely to be straight and square with the room. Measure out from this wall, at each end, the width of two planks including the tongue plus ,, for expansion.
2. Snap a chalk line from these points, parallel to that wall.
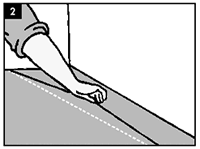
3. Prior to installing the flooring, secure a straight edge inside the chalk line to act as a guide and to prevent the row of planks from shifting during installation. The straightedge could be a straight piece of lumber or piece of flooring. Alternatively, the first row can be face-nailed with finishing nails into the wood subfloor or sprig nailed into a concrete subfloor.
Spreading the Adhesive
Using the proper trowel, hold the trowel at a 45, angle to ensure proper spread rate of adhesive. Apply pressure to allow the trowel to leave ridges of adhesive on the substrate with little adhesive left between the ridges. This will help to achieve the proper spread rate of the adhesive. Temperature and air flow across the adhesive can have an affect on the open time of the adhesive. adhesive will have a longer open time in areas of low humidity and will have a shorter open time in areas of high humidity.
Installing the Floor
4. Spread adhesive from the chalk line / straightedge out to approximately the width of two planks. Install the first row of starter planks along the chalk line / straightedge and secure into position with the tongue facing the starter wall.
NOTE: Proper alignment is critical. Misaligned starter rows can cause side and end gaps to appear in proceeding rows of flooring. When you have the starter rows complete, you can begin the next row. Use 3M blue tape to hold the boards together tight and to prevent movement or gapping.
5. When you are certain the first two starter rows are straight and secure, spread adhesive 2 to 3 feet wide across the length of the room. As a general rule, never spread more adhesive than can be covered in 30 to 45 minutes. If the adhesive has skinned over remove dried adhesive and trowel new adhesive.
6. Continue to install planks and push them into place. Place the tongue of the board into the grooves of installed boards and press into the adhesive. Use 3M blue mask tape to hold planks together to reduce gaps and movement. As you continue working across the floor try to maintain a six-inch minimum space between end joints. Randomly install different lengths to avoid a patterned appearance.
NOTE: Never strike a rubber mallet or hammer directly on the flooring to engage the tongue-and-groove. This practice can damage the flooring and/or the finish.
7. Remove the adhesive from the surface of the installed flooring as you work , this will help to save time. A damp rag with water or mineral spirits will remove -Glue, NOTE: When using Adhesive, clean the floor as you are working using mineral spirits or AR 2000 Urethane Adhesive Remover , DO NOT USE WATER. Frequently change towels to avoid leaving a haze on the flooring surface.
8. After the floor is complete remove the straight edge and glue down the first two boards.
9. Restrict foot traffic for a minimum of 6-8 hours and wait 24 hours before permitting moving of furniture onto the floor.
10. Carefully remove the 3M blue tape 24 hours after installation is completed. Do not wait more than 24 hours to remove tape since it may damage the floor.
11. Clean any wet adhesive from the flooring with a lightly dampened clean cloth or sponge. If the adhesive has dried, use mineral spirits on a clean cloth. Remove adhesive with AR 2000 Urethane Adhesive Remover.
Final Inspection: After the floor has been cleaned, inspect the floor for nicks, scratches, gaps or planks that may have moved during installation, as well as any other imperfections that need attention. Touch up nicks and scratches with touch-up products. In typical climates, the new floor can accept foot traffic within 24 hours. In areas where additional curing time is required, more time may be needed.
Nail / Staple-Down Installation
Before you begin using the following instructions, please refer to the Pre-Installation Job Prep. information above.
NOTE: Our products are not warranted against squeaking, popping or crackling when using staple-down or nail-down installation methods. Some squeaking, popping or crackling is normal and possible when using staple-down or nail-down installation methods. These symptoms may be aggravated in arid areas or during dry conditions.
SETUP AND USE OF PNEUMATIC STAPLERS AND NAILERS
IMPORTANT NOTE: Only use manufacturer's recommended staples or cleats.
For 3/8, thick products the minimum length staple/ cleat is 1,
For ,, thick products the minimum length staple/cleat is 1 ,,
Read and follow the manufacturer's instructions for complete set-up and operation of equipment.
Getting Started
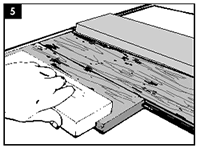
1. After the subfloor has been properly cleaned and prepped cover the subfloor with 15lb. asphalt felt paper. This material will help to keep the floor clean and help to retard moisture from below (there is no complete moisture barrier system for staple or nail-down applications).
2. Select a starter wall. An outside wall is best: it's most likely to be straight and square with the room. Measure out from this wall, at each end, the overall width of the plank (board width + tongue + ,, for expansion).
3. Snap a chalk line from these points, parallel to that wall.
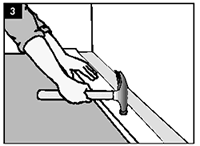
4. Install the first row of starter planks along the chalk line/straightedge and secure into position with the tongue facing away from the starter wall (toward you). Drill pilot holes through the face of the plank every 6, (in the dark grain); approximately 1, from the back edge of the board and secure planks with 1, finishing nails. Countersink nails and fill with appropriate colored wood filler , remove excess filler from surface.
5. Blind nail at a 45, angle through the tongue 1,-2, from the end joints and every 6, in between along the length of the starter boards (Predrill holes to make this easier). Depending on the width of the flooring it may be necessary to do this for the first few rows prior to using a pneumatic stapler/ nailer.NOTE: Proper alignment is critical. Misaligned starter rows can cause side and end gaps to appear in proceeding rows of flooring.
Installing the Floor
6. Continue to install the flooring making sure to nail / staple 1,-2, from the ends and every 3, , 4, thereafter. Make certain the tool is adjusted properly to ensure that the fastener is at the proper a ngle and is flush within the nail pocket. As you continue working across the floor try to maintain a six-inch minimum space between end joints. Randomly install different lengths to avoid a patterned appearance.
7. If needed use a tapping block to help engage the boards together until the tongue-and-groove is flush and tight and no gaps are present between adjacent planks. NOTE: Never use a rubber mallet or hammer directly on the flooring to engage the tongue-and-groove. This can damage the flooring and/or finish.
8. The last few rows will need to be fastened by hand. To fasten the final planks into place, you must either manually blind nail and / or face-nail through the surface on the final planks. Drill pilot holes at a 45-degree angle to the floor and blind nail using l, finishing nails. Alternatively, drill pilot holes in the face every 6, (try to drill holes in darker portion of the wood) and install with 1, finishing nails. Countersink nails and fill with appropriate colored wood filler , remove excess filler from surface with a clean rag and proper cleaner.
Floating Floor Installation
Before you begin using the following instructions, please refer to the Pre-Installation Job Prep information above.
- 6 Mil Polyethylene not required over a vinyl, wood, or a wood product sub floor.
- 6 Mil Polyethylene required over concrete type subfloors , on grade or below grade.
- Do not install over carpet.
- If installing over vinyl, ensure that the vinyl is secure to the sub floor. Do not install over perimeter glued vinyl.
- If installing over an existing wood floor, install the flooring at right angles to the wood floor.
- Secure creaking and loose floorboards with screws.
- Do not install over wood flooring glued to a concrete sub floor.
- ,, of expansion space required at all vertical surfaces.
Getting Started
1. Remove all doors and shoe moldings. Undercut all door casings 1/16, higher than the thickness of the flooring and underlayment to be installed. Place a scrap piece of plank and a sheet of underlayment against the door casing to act as a guide and cut the door casing with a hand saw or power jamb saw set to the correct height.
2. After determining the direction to run the planks, measure the width of the room (the dimension perpendicular to the direction of the flooring). The last row of the flooring should be no less than 1 ,, wide; if it is less, cut the width of the starter row to avoid a narrow last row.
3. Select a starter wall. An outside wall is best: it's most likely to be straight and square with the room. Measure out from the wall, at each end, the overall width of the plank plus ,, for expansion. If the first row requires ripping then measure from the wall the width of the ripped board plus ,, for expansion.
4. Snap a chalk line using a (brightly colored chalk) from these points.
5. Install Underlayment: Unroll the 6 mil. Poly sheeting overlapping edges 4, and seal seams with clear plastic tape. Allow the poly to run 2, up the wall and trim back after installation of flooring. Install 1/8, foam underlayment.
NOTE: Use of a floating floor 2 in 1 underlayment may be used. Follow manufacturer,s instructions for application installing the 2 in 1 underlayment.
6. Prior to installing the flooring, secure a straight edge (starter board) inside the chalk line to act as a guide and to prevent the row of planks from shifting during installation. The straightedge could be a straight piece of lumber or piece of flooring. This is temporary and will be replaced as the floor is completed.
Installing the Floor
7. Insert spacers at walls to maintain the expansion space between the flooring and the wall.
8. Before starting to glue planks, dry lay the first two rows of flooring. Working from left to right, install planks so that the groove faces the straight edge (starter board). When reaching the end of the first row, cut the plank as necessary to fit. On the first 4 rows stagger end joints a minimum of 16, and then 8, thereafter.
9. Use the remainder of the plank from the first row to start the second row. If the piece is less than 8, long, cut a new plank in half and use that piece to start the second row.
10. Lay the remainder of the planks in the second row. Make sure that the rows are straight and no gapping exists on the sides or ends. Once you have dry laid the first two rows, remove all the planks in order. You are ready to begin.
11. Begin gluing the boards; Run a continuous bead of adhesive along the groove of the short side (width) with Adhesive and glue the plank,s side GROOVE (length) at 6, intervals using Adhesive. (i.e. glue 6,, skip 6,, glue 6,). Proper alignment is critical. Misaligned starter rows can cause side and end gaps to appear in proceeding rows of flooring.
12. Install first row of planks with groove facing the straight edge. Work from right to left. Complete the first row. Make sure there are no gaps between the boards. Use a tapping block if need to close the boards together. Immediately wipe away any excessive adhesive with a clean, slightly dampened cloth.
CAUTION: Adhesive that is allowed to dry on the finish surface can be difficult to remove and may leave a haze.
13. At the end wall use an end pry bar, if needed, to pull the ends of the planks tight.
14. Continue to install the floor working left to right, repeating the process until the completion of the floor. Continue to use the spacers on all vertical surfaces to maintain the ,, expansion.
15. If needed after several rows of planks are installed, use 3M 2080 Long Mask Blue Tape 12, apart to hold the planks securely, DO NOT USE laminate straps as they may damage the flooring.
16. The last row will most likely require cutting to width but it should be no less than 1 ,, wide. To do this, lay the plank face up on top of the last full row installed. Trace the wall contour on the last plank using a scrap piece of plank and a pencil.
17. Install cut planks and pull into place with a pry bar. Install spacing wedges between planks and wall.
18. Remove the straight edge (starter row) and install the last row using the pry bar.
Allow floor to dry for a minimum of 12 hours before removing all spacing wedges and allowing foot traffic.
19. Install trim and moldings the following day.
COMPLETING THE JOB , ALL INSTALLATIONS
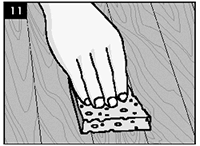
- Clean the floor with Bona,Swedish Formula, Hardwood Floor Cleaner.
- Install transition pieces -i.e. , thresholds, t-moldings, base boards and quarter round. Nail moldings to wall, not the floor.
- Inspect final floor for nicks and or minor gaps , fill with appropriate color wood putty.
- Leave Warranty and Maintenance brochure with customer.
- Unused material should be left with owner and stored in a dry place in case of future repairs are needed.
- Use plywood or hardboard when moving heavy appliances or furniture across floor.
Floor Protection During Construction: Always protect the surface of the installed flooring during construction by laying a quality rosin paper or other paper that will allow the floor to breathe, taping it to the baseboards. Never use plastic or polyethylene sheeting to cover the floor since they will trap moisture that will damage the flooring.
Moldings Help You Make Easy Transitions
- T-Moldings: Used to create a transition between floor coverings of similar heights or to cover an expansion gap.
- Stair Nosing: Used in conjunction with flooring installed on steps or provide a finished edge. Secure by gluing and nailing/screwing down into place. Predrill holes to avoid splitting.
- Reducer Strips: Used to transition floor coverings of differing heights- wood floor to vinyl, vinyl composition tile, or low-pile carpet. Can also be used to border a fireplace.
- Thresholds: Used to transition floor coverings or to create a break between floor coverings , wood to carpet, can be used as a trim molding around fireplaces or sliding glass doors.
- Shoe Base Moldings: Used to cover the expansion space between the floor and vertical surfaces. Can be used as a substitute for Quarter Round moldings when space is a limitation.
- Quarter Round Moldings: Used to cover the expansion space between the Wall Base and your hardwood floor. You can also use them to make smooth transitions between the floor and cabinetry.
- Wall Base Moldings: Can be stained and finished to the color of the flooring to be used an alternative to painted baseboards.